OptionStation Pro
Option Chains Panel
The Option Chains panel in the Options tab is where you view the available options/spreads to trade. To access this window, click the Options tab in OptionStation Pro.
Placing a Trade
There are many ways to place a trade from the Option Chains panel:
- To buy a Call or Put, click the Ask price at your intended Strike.
- To sell a Call or Put, click the Bid price at your intended Strike.
- Right-click on the Bid or Ask column and select Buy or Sell.
- Select Trade from the Click to drop-down menu, hold down the Ctrl key, and click next to your intended Strike to build a spread with up to four legs. For more information, see Advanced Spread Building.
- To roll a position, click the Position quantity, and drag and drop it to the Position column at your intended Strike. You can roll a position within one expiration term and across expiration terms.
- To close a position, click the Position quantity to open the Trade Bar.
- Right-click the Position quantity and select Close Position or Roll Position from the shortcut menu.
The Trade Bar will open with your order automatically populated and ready to trade.
Using the Option Chains Panel
The Option Chains Panel contains the following features:
 Menu bar
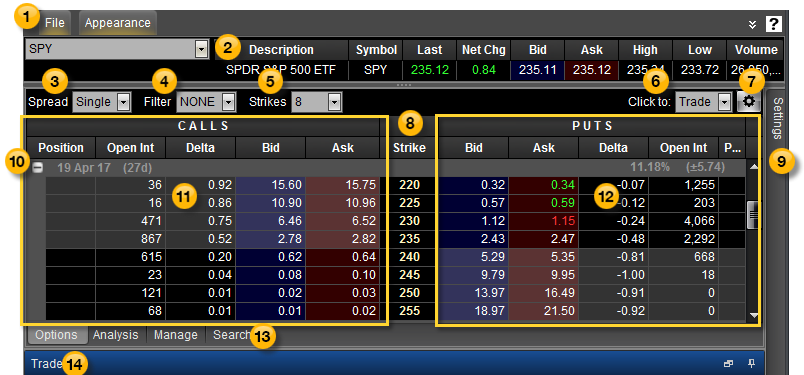
The menu bar includes the File menu for saving your layout and settings, and the Appearance menu for changing the visual skin of OptionStation Pro based on different templates.
 Asset panel
The Asset panel shows data on the symbol for the underlying asset that you enter, and allows you to click on the Bid or Ask price to place a trade.
 Spread Type
The Spread type drop-down list is used to select a single option or . The option chain displayed will change the Strike price column and related Calls and Puts values to reflect the specified type.
 Filter
The Filter drop-down list is used to adjust the following settings:
- Strike Range: Determines the number of strikes displayed for a given expiration. The values on the left and right specify the number of strike prices below and above the current price of the underlying asset. Use the slider or text box to change each number. The letters ATM (At-The-Money) with a triangle beneath it point to where the strike price is the same as the underlying asset price.
- Num. Expirations: Determines the number of expiration dates to display (the default is ALL).
- Expiration Types: Determines the types of expirations to display. Select Monthlys, Weeklys, and/or Quarterlys.
- Deliverables: Determines the type of options symbols to display. Select Regular, Non-Standard, and/or Mini (1/10 of a standard sized option).
- Spread Width: Determines the distance between strikes in a spread.
Click Reset to reset to the default settings or Apply to apply the filter.
 Strikes
The Strikes drop-down list is used to adjust the strike interval. The option chain displayed will change the spread construction, and the bid and ask prices will automatically recalculate.
 Click to
The Click to drop-down menu enables you to rapidly open, close, and roll trades.
- Select Trade from the drop-down menu to place an order, or Analyze Trade to send your spread to the Analysis tab.
- Select Trade, hold down the Ctrl key, and click next to your intended Strike to build a spread with up to four legs. For more information, see Advanced Spread Building.
- If you selected Trade, depending on your preferences, the order will be sent with or without an order confirmation.
 To enable/disable order confirms, from the TradeStation Menu bar, use the File > Preferences > TradeStation Order Entry menu sequence and select Options > Validations & Confirms.
If you selected Analyze Trade, the spread will appear in the Analysis tab.
 Configure
The Configure button is used to customize the panel. See Option Chains Columns, below.
 Strike
The Strike column shows the strike price of each option leg. The option chain can show up to four strike prices.
 Settings tab (panel)
The Settings panel enables you to adjust parameters for elements in the OptionStation Pro panels. This allows you to invoke what-if scenarios on your simulated and current positions. For example, you can change the pricing model, volatility, date ranges, and interest rates as well as graph the Greeks, then see the how these scenarios will play out in the 2D/3D Graph.
 Expirations
From left to right, the Expiration title row for each spread shows the:
- Expiration date: The date the option expires.
- Number of days left to expiration: the number of days the option is available for trading prior to expiration.
- Term: Monthly terms are not labeled. Weekly, Quarterly, and End of Month (EOM) terms are labeled and highlighted to emphasize lower liquidity. See Option Term in the glossary.
- Average implied volatility: the average of the option's implied volatility within the specified term.
- Expected move: the price change (in dollars and cents) that the underlying may experience during the time period prior to the option expiration date.
 Calls
Calls
The columns listed under CALLS show the Bid and the Ask prices for Call options along with other option values such as Volatility, Greeks, or Positions.
 Puts
Puts
The columns listed under PUTS show the Bid and the Ask prices for put options along with other option values such as Volatility, Greeks, or Positions.
 Options, Analysis, Manage & Search tabs
The Options tab (pictured) is displayed by default. Click the Analysis, Manage, or Search tab to customize your trades.
 Trade Bar
After you click Buy or Sell, the OptionStation Pro Trade Bar will open. Your order will be automatically populated and ready to trade. The Trade Bar evaluates your positions when it opens and automatically sets the Open/Close actions for each spread leg. The settings are also manually adjustable.
Option Chains Columns
The columns in the Option Chains panel can be added, removed, sorted, repositioned, copied to your clipboard, and exported to Microsoft Excel.
Default columns (in order of appearance)
- Position – The number of contracts (+ for long and - for short).
- Open Int – The total number of open option positions for the specific option contract.
- Delta – The Delta option sensitivity of the option. For more information, see the Glossary.
- Bid – The current bid price of the call or put option.
- Ask – The current offer or sale price of the call or put option.
- Strike – The option chain can show up to four strike prices.
Other available columns (in alphabetical order)
- Ask Size – The number of contracts being offered for sale for each strike shown.
- Bid Size – The number of shares being offered for purchase for each strike shown.
- Close – The closing option price from regular trading hours.
- Exp – The expiration date of the option.
- Extrinsic – The time value portion of the options price.
- Gamma – The Gamma option sensitivity of the option. For more information, see the Glossary.
- High – The high price of the asset for the day.
- Imp Volatility – The volatility that is implied by the price of the option.
- Intrinsic – For calls: the intrinsic is max[underlying price - call strike price, 0]. For puts: max[put strike price - underlying price, 0]. For more information, see the Glossary.
- IV Skew Vol – The IV Skew Approximation volatility values.
- Last – The last traded price of the option.
- Low – The low price of the option for the day.
- Mid – The mid price is the average of the bid and ask prices.
- Net %Chg – The net change in percent since the last daily close.
- Net Chg – The net change of the asset since the last daily close.
- Open – The opening option price from regular trading hours.
- Prev Close – The closing price from the previous regular trading session.
- Prev Volume – The number of shares traded from the previous regular trading session.
- Prob BE – The probability of breaking even at expiration.
- Prob ITM – The probability of expiring in-the-money for each single option.
- Prob OTM – The probability of expiring out-of-the-money for each single option.
- Rho – The Rho option sensitivity of the option. For more information, see the Glossary.
- Symbol – The symbol for each option.
- Theo Value – The theoretical value displays the theoretical option price calculated using the Pricing Model selected in the Settings Panel.
- Theta – The Theta option sensitivity of the option. For more information, see the Glossary.
- Vega – The Vega option sensitivity of the option. For more information, see the Glossary.
- Volume – The number of shares traded so far in the current day. The Asset Panel displays shares; the Option Chains panel displays contracts.
Asset Panel
Entering a Spread
Settings
Simulated Positions