OptionStation Pro Trade Bar
From the Trade Bar in OptionStation Pro, you can:
- Directly trade your option or spread created from a simulated position (Analysis tab), current position (Manage tab), the Asset panel, or row on the Option Chains panel.
- Close an equity, single, or spread from a current position.
- Roll a single or spread from a current position.
- Send your trade to the Analysis tab for analysis.
Sending your Trade to the Trade Bar
Send your trade to the Trade Bar from any of the following panels:
- Asset panel: Click on the Bid or Ask price to Sell or Buy, or right-click on the Bid or Ask price and select Buy or Sell to open the Trade Bar.
- Option Chains panel: Click on the Bid or Ask price to Sell or Buy, or right-click on the Bid or Ask price and select Buy or Sell to open the Trade Bar.
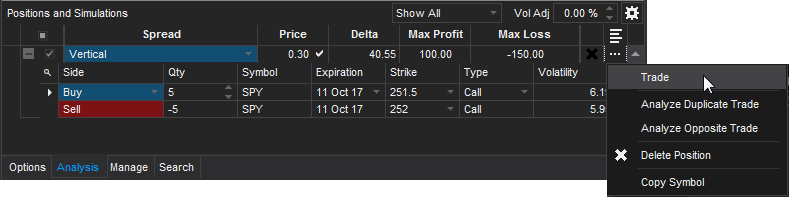
- Positions and Simulations panel (Analysis tab): Click the
 button to the right of the spread row and select Trade to send your single or multi-legged spread trade to the Trade Bar.
- Positions panel (Manage tab): Roll a single position or spread and send it to the Trade Bar.
Working with the Trade Bar
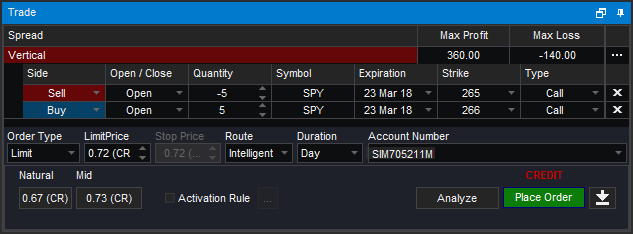
When you place a trade, your order parameters will be automatically populated in the Trade Bar. The Trade Bar evaluates the existing positions when it opens and automatically sets the Open/Close actions for each spread leg. The actions settings are also manually adjustable.
The Trade bar appears docked at the bottom of your OptionStation Pro window. Use the Auto Hide (pin icon) at the upper right of the title bar to hide the panel. You can also click the Float icon (next to the pin) and drag the window to a new location. Right-clicking on the title bar of the Trade tab also allows you to Float, Dock, or Auto Hide. See Working with Panels for more information.
Trade Bar Headings
The following headings are displayed on the top of the Trade Bar:
- Spread - Shows the type of spread (Single, Vertical, Butterfly, Collar, etc.).
- Max Profit - Shows the maximum potential gain of the position.
- Max Loss - Shows the maximum potential loss of the position.
Setting up your Order
To set up your order, select from among the following:
Leg parameters
The parameters for each leg are automatically populated when you create a new order from a specified spread. However, you may change them at any time using any of the following:
- Side - The buy (long) or sell (short) side of the leg.
- Open/Close - Specifies whether the leg will be used to open or close an option position.
- Quantity - The requested number of contracts for a particular order.
- Expiration - The expiration date of a leg.
- Strike - The strike price of a leg.
- Type - The Put or Call type of a leg.
To delete a leg, click the X to the right of the leg row.
Order parameters
New order parameters are automatically populated based on their default values. However, you may change them at any time using any of the following:
- Quantity Multiplier - This parameter only displays when you have checked it in Settings. It applies a multiplier to the quantity of each leg when the order is placed. For example, if you want to sell a strangle on a ratio of 2 puts to 1 call, you can update the quantity multiplier field to sell the number of ratios that you specify. When you change the quantity multiplier, the Max Profit and Max Loss values displayed in the Trade Bar will adjust automatically.
- Order Type
- Limit - Used to enter or exit a position only when the market reaches the specified Limit Price or better (at-or-below for buy orders and at-or-above for sell orders).
 New Trade Bar orders default to a Limit Order and will automatically set the Limit Price to Mid. You may also click the Natural button to use the Ask price for a Debit Order to Open and the Bid price for a Credit Order to Open. In addition, you can type (or scroll) your own price in the Limit Price box.
- Market - Allows you to enter or exit a position at whatever the current market price is at the time the order reaches the exchange.
- Stop Limit - Used to enter or exit a position after both of the following occur: first, the market/asset reaches the specified Stop Price, this then triggers a limit order to be sent to execute at the specified Limit Price or better. The Stop price must be better than the current market price at the time the order is sent, and the Limit price must be better than the Stop price.
- Stop Market - Allows you to enter or exit a position only when the market reaches the specified Stop Price (at-or-above for buy orders or at-or-below for sell orders). When the Stop price is reached a Market order will be sent. Stop orders are not typically visible to the market until the Stop price is reached and the order is activated.
- Limit Price - The limit price (if any) for the order.
- Stop Price - The stop price (if any) for the order.
- Route - The route used to place an order.
- Duration - The length of time that your order will remain valid in the market.
- Account Number - Allows you to select the account number for your order.
- Natural - The price that is typically used when sending a market order. When buying an option, the natural price would be the Ask. When selling an option, the natural price would be the Bid.
- Mid - The mid price of the option in real-time between the Bid and the Ask.
- Activation Rule - Allows you to place an activation rule on your spread order. Check the Activation Rule checkbox and then click the button to open the Activation Rule dialog.
- Analyze - Sends your trade to the Analysis tab for analysis.
- Place Order - The Place Order button is used to send your order to the market.
- DEBIT - The word DEBIT appears in blue above the Place Order button when you are placing a trade that will result in an initial debit to your account.
- CREDIT - The word CREDIT appears in red above the Place Order button when you are placing a trade that will result in a credit to your account.
Once you place an order, the Confirmation dialog is displayed allowing you to review the order before sending it to the market. The Confirmation dialog summarizes the specific legs and quantities for your order, as well as the order route, duration, advanced options, account, estimated max profit, and estimated max loss. In addition, it will list the Estimated Price and Estimated Cost (or Credit for credit spreads).
Click Yes to send the order, or click No to cancel the order.
- Hide - The
 button is used to hide the Trade Bar without sending the order. Click the Trade tab to view the Trade Bar when it is hidden.
![]() Refer to Trigger Types for more information about specifying the price pattern that will trigger a stop order.
Refer to Trigger Types for more information about specifying the price pattern that will trigger a stop order.
![]() If you have multiple accounts, you can select Send to All Accounts to send the same order to each account.
If you have multiple accounts, you can select Send to All Accounts to send the same order to each account.
Closing a Position
You can close a position in several ways using OptionStation Pro:
- To close a single leg from the Positions panel on the Manage tab:
- Click the button for the desired leg, then select Close Leg. The Trade Bar will appear with your order to close a single leg.
- Click the
- To close a position from the Positions panel on the Manage tab:
- Click the button for the desired position, then select Close this Position. The Trade Bar will appear with your order to close a position.
- Click the
- To close a simulated position from the Positions and Simulations panel on the Analysis tab:
- Click the button for the desired position, then select Close Position. The Trade Bar will appear and will automatically set the Open/Close order action to Close.
- Click the
Rolling a Position
You can roll a single position or spread in several ways using OptionStation Pro:
![]() For Roll Orders, a grey divider bar displays between the closing legs and the opening legs. The opening legs have combo boxes so you can adjust the parameters before sending the order.
For Roll Orders, a grey divider bar displays between the closing legs and the opening legs. The opening legs have combo boxes so you can adjust the parameters before sending the order.
- To roll a spread:
- From the Positions panel on the Manage tab, click the button for the desired spread, then select Roll this Position. The Trade Bar will appear with your order to roll the entire spread.
From the Positions and Simulations panel on the Analysis tab, click the
button for the desired spread, then select Roll Position. The Trade Bar will appear with your order to roll the entire spread.
- From the Positions panel on the Manage tab, click the
- To roll a single leg from the Positions panel on the Manage tab:
- Click the button for the desired leg, then select Roll Leg. The Trade Bar will appear with your order to roll a single leg.
- Click the