Entering a Spread
- Enter a symbol in the Asset panel in the upper-left corner (for example, SPY).
- OptionStation Pro displays the available option data for SPY in the Options tab, including a list of expiration terms.
- Click the arrow to the left of each term label to reveal all the options in that term.

The Option Chains panel enables you to see all the CALLS (on the left) and PUTS (on the right) available for the expiration term you have opened.
Spread Type
At the top of the Option Chains panel is a Spread Type drop-down menu that lists several standard spreads. Clicking on any one of these spread types will update the Option Chains panel to show the available options in the form of the selected spread.
For example, selecting a spread type of Butterfly would display an option chain that includes three Butterfly strike prices in the Strike column.
![]() Full customization of the spread for changing strikes, number of contracts, and other criteria are available in the Positions and Simulations panel in the Analysis tab.
Full customization of the spread for changing strikes, number of contracts, and other criteria are available in the Positions and Simulations panel in the Analysis tab.
Using the Option Chains panel to view options based on a particular spread allows you to see the total premium for the spread (Bid, Ask, or Mid prices), the composite Greeks and volatility values, as well as your positions.
To enter a position to buy or analyze, right-click on the Bid or Ask price for the option or spread you are interested in. Right-click the Bid of the option or spread to create a Short position. Right-click the Ask to create a Long position. Right-click on the left side of the Strike column to use Calls. Right-click the right side of the Strike column to use Puts.
When you place an order, the Trade Bar panel will open. Your order will be automatically populated and ready to trade.
When you create a simulated position, it will be placed in the Positions and Simulations panel in the Analysis tab.
Advanced Spread Building
 VIDEO - Building Spreads Quickly with OptionStation Pro
To build a spread:
- Ensure that Single is selected from the Spread Type drop-down menu.
- Ensure that Trade is selected from the Click to drop-down menu.
- Click next to your intended Strike to add a leg. Hold down the Ctrl key. You can add up to four legs.
-
The Trade Bar will open with your order populated and ready to trade.
![]() The color of the call or put row will change depending on the direction of the leg. If you click on the Bid price, the row will become red, since this is the color of a short option. If you click on the Ask price, the row will become blue, since this is the color of a long option. Dragging and dropping the line will draw the hold row, when dragging, on the respective side (call or put). The legs in the Trade Bar will display in the same color.
The color of the call or put row will change depending on the direction of the leg. If you click on the Bid price, the row will become red, since this is the color of a short option. If you click on the Ask price, the row will become blue, since this is the color of a long option. Dragging and dropping the line will draw the hold row, when dragging, on the respective side (call or put). The legs in the Trade Bar will display in the same color.
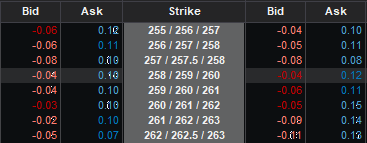
![]() The shaded portion of the Strike column displays the range of the expiration's expected move, so you can gauge the probability and placement of your option strategies. As you add legs, green and red bands may display on the sides of the Strike column to show the breakeven point of profit or loss at expiration. If you have either a put or a call selected on the option chain, you may see a colored band on that side of the Strike column; if you have both a put and a call selected, you may see colored bands on both sides of the Strike column.
The shaded portion of the Strike column displays the range of the expiration's expected move, so you can gauge the probability and placement of your option strategies. As you add legs, green and red bands may display on the sides of the Strike column to show the breakeven point of profit or loss at expiration. If you have either a put or a call selected on the option chain, you may see a colored band on that side of the Strike column; if you have both a put and a call selected, you may see colored bands on both sides of the Strike column.
If you want to start over, release the Ctrl key and click next to your intended Strike.
Related Topics